
Sauna Plans PDF: A Comprehensive Guide
Embark on your sauna construction journey with our comprehensive PDF guide! This resource offers detailed sauna plans, perfect for DIY enthusiasts and professionals alike․ Discover essential considerations, step-by-step instructions, and expert tips for building your dream sauna․ Access layouts and designs that suit various needs and preferences․
Sauna design and construction represent a blend of traditional practices and modern techniques, aiming to create a space for relaxation and wellness․ Understanding the core principles is crucial, whether you opt for a DIY approach or seek professional assistance․ This introduction delves into the fundamental aspects of sauna building, focusing on the importance of proper air exchange, insulation, and heater selection․
Key considerations include the type of sauna structure, whether it’s a freestanding cabin or an integration within an existing room․ Ventilation is paramount to ensure a clean and long-lasting sauna, preventing moisture buildup and promoting a comfortable environment․
Exploring various sauna layouts, such as custom designs or modular setups, allows for personalization and adaptation to specific spatial constraints․ Factors like accessibility, especially for handicap-accessible designs, should also be taken into account․
This section provides a foundation for navigating the complexities of sauna construction, highlighting the significance of each element in achieving optimal performance and safety․ By grasping these initial concepts, builders can proceed with confidence toward creating a functional and enjoyable sauna experience․ Remember to always consult with professionals and adhere to local building codes for a successful project․
Key Considerations Before Building a Sauna
Before embarking on your sauna construction project, several key considerations must be addressed to ensure a successful and satisfying outcome․ Firstly, determine the type of sauna you desire: will it be a freestanding structure or integrated into an existing space? Assess the available space and any structural limitations, such as wall types and ventilation possibilities․
Consider whether the sauna will be for domestic or commercial use, as this impacts material choices and safety requirements․ Proper ventilation is crucial to manage condensation and maintain air quality, preventing the build-up of moisture that can damage the structure and create an unhealthy environment․
Think about the sauna’s layout and design; Will it be a traditional design or a custom creation? Factor in accessibility needs, ensuring the sauna is usable for everyone․ Heater selection is also paramount; choose a heater with the appropriate kilowatt size for your sauna’s volume, and ensure it meets safety standards․
Finally, review local building codes and regulations to avoid any compliance issues․ Thorough planning and careful consideration of these factors will set the stage for a well-built, enjoyable, and safe sauna experience․ Don’t overlook safety tips and ensure overlooked construction details are addressed․
DIY Sauna Construction: Step-by-Step Guide

Embarking on a DIY sauna project can be rewarding․ This step-by-step guide simplifies the process․ First, prepare the foundation by ensuring a level surface, whether concrete or a sturdy wooden frame․ Next, construct the frame using 2×4 spruce studs, spaced appropriately for wall stability․ Ensure all corners are square and securely fastened․
Then, install insulation within the frame to retain heat efficiently․ Apply a vapor barrier over the insulation on the warm side to prevent moisture penetration․ Proceed with the interior paneling, using tongue-and-groove cedar or other suitable wood, installed horizontally for structural integrity․
Install the sauna door, ensuring a tight seal to prevent heat loss․ Construct benches at varying heights for comfortable seating․ Choose and install the sauna heater, adhering strictly to manufacturer instructions and electrical codes․ Proper wiring is crucial; consult a licensed electrician․
Finally, install ventilation to ensure air exchange․ Test the sauna, monitoring temperature and humidity levels․ With careful planning and execution, your DIY sauna will be a haven for relaxation․ Always prioritize safety and follow all local building codes․ Remember to enjoy the process!
Framing the Sauna: Essential Techniques
Framing is the backbone of any successful sauna build, demanding precision and the right techniques․ Begin by selecting quality lumber, ideally spruce or fir, ensuring it’s straight and free from knots․ Construct the base frame, ensuring it’s level and square, as this will dictate the entire structure’s integrity․ Use pressure-treated lumber if the sauna will be in contact with the ground․
Employ 2×4 studs for the walls, spacing them 16 inches on center to provide adequate support for insulation and paneling․ For larger saunas, consider 2×6 studs for enhanced insulation capacity․ Pay meticulous attention to corner construction, using proper joinery techniques to create strong, stable corners․
Ensure the door opening is correctly sized and framed, accounting for the door’s dimensions and any necessary shimming․ Frame the ceiling with joists, again spaced 16 inches on center, capable of supporting the weight of insulation and roofing materials․
Properly brace the frame to prevent racking and maintain squareness during construction․ Double-check all measurements and ensure the frame is plumb and level before proceeding․ This meticulous approach ensures a durable, safe, and efficient sauna structure․ Remember, a solid frame is the foundation for a long-lasting sauna experience․
Sauna Wall and Ceiling Construction Details
The walls and ceiling are critical components, influencing heat retention and overall sauna experience․ Begin with a sturdy frame, ensuring it’s plumb and square; Install a vapor barrier, such as foil-faced paper, on the warm side of the framing (inside the sauna)․ Overlap seams and seal them with foil tape to prevent moisture penetration․
Apply insulation, preferably mineral wool or fiberglass, between the studs and joists, ensuring a snug fit to minimize heat loss․ Cover the insulation with an inner layer of tongue-and-groove (T&G) paneling, ideally cedar, redwood, or spruce, chosen for their heat resistance and aroma․ Attach the paneling horizontally, using stainless steel nails or screws to avoid corrosion․
For the ceiling, prioritize proper insulation due to rising heat․ Consider a double layer of insulation for optimal energy efficiency․ Ensure the ceiling is adequately supported to bear the weight of the insulation and paneling․ Maintain a small air gap between the ceiling and roof to prevent moisture buildup․
Pay attention to detail around windows and doors, ensuring proper sealing to prevent air leaks․ Use heat-resistant sealant to fill any gaps․ The wall and ceiling construction should create an airtight envelope, maximizing heat retention and enhancing the sauna experience․

Insulation Requirements for Optimal Performance
Proper insulation is paramount for a sauna’s performance, influencing heat-up time, energy efficiency, and overall comfort․ The key is to create a well-sealed thermal envelope that minimizes heat loss․ Opt for high-quality insulation materials with a high R-value (resistance to heat flow)․ Mineral wool and fiberglass are popular choices due to their heat resistance and affordability․
For walls, aim for an R-value of at least R-13, while the ceiling should have a minimum of R-19, considering heat rises․ Ensure the insulation fits snugly between the studs and joists, leaving no gaps or voids․ Compressing the insulation reduces its effectiveness, so avoid over-stuffing․
Install a vapor barrier on the warm side of the insulation (inside the sauna) to prevent moisture from penetrating the wall and ceiling cavities․ Overlap seams and seal them with foil tape to create an airtight seal․
Pay close attention to areas around windows and doors, as these are common sources of heat loss․ Use expanding foam or fiberglass insulation to seal gaps and cracks․ Ensure proper ventilation to prevent moisture buildup within the wall and ceiling cavities․ Adequate insulation minimizes energy consumption, reduces heat-up time, and maintains a consistent temperature, enhancing the sauna experience․
Ventilation and Air Exchange in Sauna Design
Ventilation and air exchange are critical components of sauna design, ensuring a comfortable and safe experience․ Proper airflow helps regulate temperature, remove excess moisture, and provide fresh oxygen․ Without adequate ventilation, the sauna can become stuffy, leading to discomfort and potential health risks․
The general principle is to introduce fresh air near the heater and exhaust stale air near the floor on the opposite wall․ This creates a natural convection current, circulating air throughout the sauna․ A typical setup involves a lower vent, placed about 6 inches above the floor near the heater, and an upper vent, positioned near the ceiling on the opposite wall․
The size of the vents depends on the sauna’s size, but a good rule of thumb is to provide at least 4 inches of vent area per occupant․ Adjustable vents allow for fine-tuning the airflow based on personal preference and sauna usage․ Mechanical ventilation systems, such as fans, can enhance air exchange, especially in larger or poorly ventilated saunas․
Ensure the air intake is from a clean, fresh air source, not from a musty basement or adjacent room․ Proper ventilation is essential for a clean, long-lasting sauna․
Choosing the Right Sauna Heater and Electrical Considerations
Selecting the appropriate sauna heater is crucial for achieving the desired temperature and sauna experience․ Consider the sauna’s size, insulation, and desired heating time when choosing a heater․ Electric heaters are the most common choice for residential saunas, offering convenience and ease of use․ Wood-burning heaters provide a more traditional experience but require proper ventilation and safety precautions․
The heater’s kilowatt (kW) rating determines its heating capacity․ A general guideline is to use 1 kW per 50 cubic feet of sauna volume․ However, poorly insulated saunas may require a higher kW rating․ Always consult the heater manufacturer’s specifications for accurate sizing․
Electrical considerations are paramount for safe and efficient sauna operation․ Ensure the electrical system can handle the heater’s power requirements․ This typically involves a dedicated circuit with the appropriate breaker size․ Always use a licensed electrician for wiring the sauna heater to comply with local electrical codes․
Consider the heater’s voltage and phase requirements․ Some heaters require a single-phase connection, while others need a three-phase connection․ Proper grounding is essential for safety․
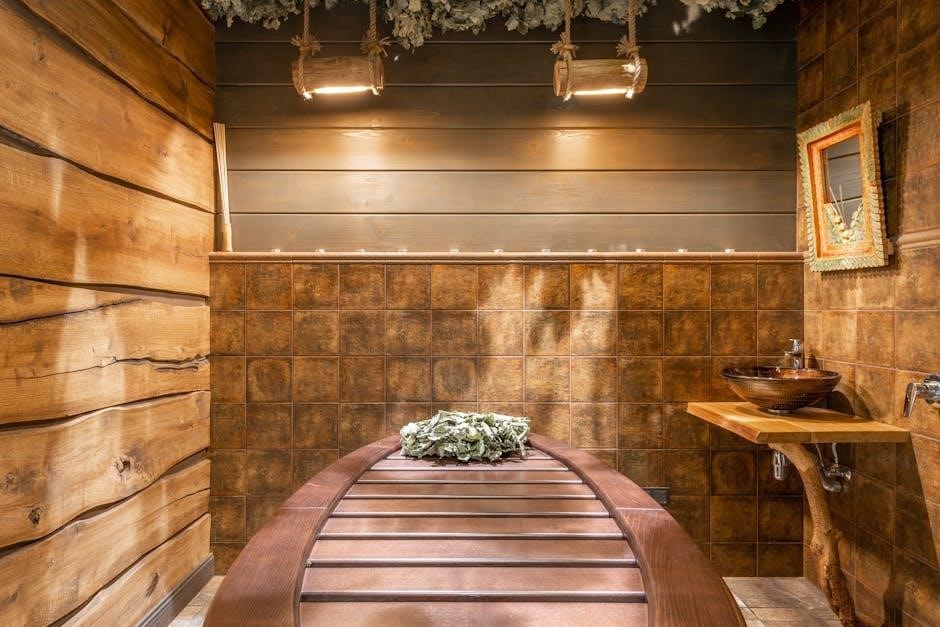
Sauna Door and Bench Construction
The sauna door and benches are essential elements that contribute to the functionality and comfort of your sauna experience․ The door must be durable, heat-resistant, and designed to retain heat while providing a secure closure․ Typically, sauna doors are constructed from wood, often cedar or redwood, known for their resistance to moisture and warping․ Ensure the door is properly insulated and features a small glass window for visibility and safety․
Bench construction is crucial for providing comfortable seating at varying heat levels․ Benches are typically arranged in tiers, with the highest bench offering the hottest experience․ Use heat-resistant wood like cedar, redwood, or aspen for bench construction to avoid excessive heat absorption and splintering․
Ensure the benches are sturdy and properly supported to accommodate users safely․ Consider ergonomic design principles to create comfortable seating with adequate legroom and back support․ The height and depth of the benches should be carefully planned to optimize the sauna experience․ Proper spacing between benches is also important for ease of movement and heat circulation․
Floor Design: Materials and Drainage
The sauna floor design is critical for safety, hygiene, and longevity․ Selecting the right materials and ensuring proper drainage are paramount․ Consider using materials like tile, concrete with a sealant, or specialized sauna flooring designed to withstand high temperatures and humidity․ Wood slat floors, known as duckboards, provide a warm, dry surface and prevent direct contact with a potentially cold or wet subfloor, enhancing comfort․
Proper drainage is essential to prevent water accumulation, mold growth, and structural damage․ A slight slope towards a drain ensures efficient water runoff․ For larger saunas or those with frequent use, a floor drain connected to the plumbing system is recommended․ Ensure the drain is properly sized and positioned to handle the expected water volume․
Consider the overall aesthetic and functionality when choosing floor materials․ Non-slip surfaces are crucial for safety, especially when the floor is wet․ Proper sealing and maintenance of the floor are essential to prevent water damage and maintain hygiene․ A well-designed floor contributes significantly to the overall sauna experience․

Safety Tips and Overlooked Construction Details
Prioritizing safety is paramount when constructing a sauna․ Overlooking critical details can compromise user well-being and the sauna’s longevity․ Ensure proper ventilation to maintain air quality and prevent overheating․ Install a reliable thermostat to regulate temperature and avoid excessively high heat levels․ Always use a licensed electrician for wiring to adhere to safety standards and prevent electrical hazards․
Adequate insulation is crucial not only for energy efficiency but also for preventing burns from exterior walls․ Use heat-resistant materials for benches and other interior components to avoid discomfort or injury․ Consider the placement of the heater, ensuring sufficient clearance from flammable materials․ Install a stove guardrail for safety․
Do not forget the importance of a warm, dry floor by implementing duckboards․ Regularly inspect and maintain the sauna, addressing any signs of wear or damage promptly․ Following these safety tips and attending to often-overlooked details ensures a safe and enjoyable sauna experience for all users․
Custom Sauna Design and Planning Resources
Embark on your bespoke sauna project with a wealth of custom design and planning resources available to guide you; Tailor your sauna to specific needs and preferences, considering factors like size, shape, and unique architectural elements․ Numerous online platforms offer CAD drawings and detailed specifications, facilitating precise planning and visualization․
Explore design manuals that provide in-depth information on sauna guidelines, construction details, and material selection․ Consult with sauna specialists who can offer personalized recommendations and address any specific challenges you may encounter․ Leverage resources that showcase examples of small-scale wooden architecture to inspire your custom design․
Consider incorporating unique features such as glass panels, upgraded interiors, or specialized lighting to enhance the sauna experience․ Remember to factor in accessibility requirements, ensuring that the sauna is usable for individuals with disabilities․ With the right resources and careful planning, you can create a custom sauna that perfectly complements your lifestyle and enhances your well-being․